

Getting started in goose hunting can get expensive quickly! Waterfowl hunting in general requires quite the investment to get started. You’ll need a shotgun, ammo, licenses, waders, and oftentimes some type of watercraft… now you’ll have to spend $100-$350 for JUST six decoys!? Want to know how to make your own goose silhouette decoys from recycled materials and save hundreds of dollars doing it? Continue reading and we will teach you how.
Why Silos?
Silhouette decoys have really exploded onto the market in the past few years and there are a few reasons why. They are very effective! Silhouette decoys take advantage of the fact that waterfowl lack binocular vision. They are not capable of depth perception like us humans. A flat decoy actually appears to have movement when viewed with just one eye open. The illusion of movement is a great advantage when trying to lure a flock of geese.
Silhouette decoys have gained further popularity due to their lightweight and ease of storage. A solo hunter can now pack in multiple dozens of decoys, a task that once required various equipment and multiple hunting buddies. You can now hunt easier, farther, and longer, and the investment required to get started has plummeted!
Things You’ll Need To Make Goose Silhouette Decoys
You will need to gather some supplies before you can begin making your new decoys. You can find most of these materials rather easily at your local hardware store. Of course, you will need materials from which to cut your decoys.
Corrugated plastic campaign and advertising signs can be found all over your neighborhood. Be sure to ask permission from the company, politician, or landowner before taking any signs. Many times these people will be glad you are offering to pick up their leftover signs once their election race or promotion is over. Depending on the decoy pattern you choose you can often expect one decoy per sign for Canada Geese.
After you collect enough signs to create six, twelve, or multiple dozens you’ll need to gather a few more common supplies. You will need a marker, razor blade, cardboard/or poster paper, primer, and paint will all be required to trace, cut, and paint your decoys. For staking out your decoys you can use a variety of materials. Paint stirrer sticks, wooden dowels, aluminum bar stock, and steel stakes will all work fine.
What we’ve found to work best and most cost-effective is actually ordering pre-made stakes from a name-brand company. Pre-made stakes save weight, are strong enough to penetrate hard ground, and save you a lot of time.
Designing Your Decoys
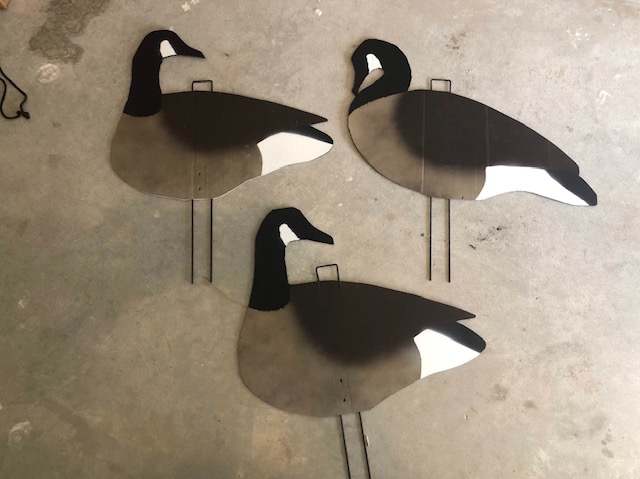
Now comes the fun part! You get to decide what positions and colors you want your decoys to be in. Live geese obviously have many active and inactive positions, the two easiest ways to choose your own positions are to simply browse Google images, or visit your local park pond and snap some photos of the geese there. You can then draw your favorite positions onto poster paper or cardboard to create some reusable templates.
We suggest having an active or semi-active position, a sentry position, and a feeding position. If you would like to get creative, or the temperatures you’re hunting in demand it, you can also create some preening or sleeper positions to add realism to your decoy spread.
As far as color goes this can be as simple or detailed as you like. Hunters have killed geese over black and white silos for years. From a distance, a goose looks mostly black with some bright white patches anyways. I’ve chosen to go with a simple four-color pattern on my decoys to add realism but still make it an easy process so I can make a few dozen without wasting any time.
I start with a tan base coat from the neck/chest to the tail, I then create a wing area with dark brown paint and feather the edges to blend with the tan. After those are done I take my neck/tail and cheek/rump templates and layer on the black and white areas. I’ve chosen to use Rustoleum ultra-matte camo paints as they are affordable, easy to find, and reduce glare.
Finishing Up and Taking It a Step Further
After all your decoys have dried you can now install your stakes. With flat wood and metal stakes, you will have to glue, tape, or bolt your stakes onto your decoys. With the pre-made stakes I mentioned earlier you simply insert the stakes into the channels in the plastic material.
If those channels don’t line up perfectly to have your decoy stand up straight, don’t worry, simply take a lighter or another source of heat and heat up the end of your stakes (be careful, they will be hot…) then insert them into the channels diagonally and push them down as they melt through the walls of the channels. Now your decoy should stand up straight when stuck in the ground.
You can definitely be more detailed when making your own goose silhouette decoys. Adding feather detail or glossy paint for the eyes and bills are some easy ways to add more realism. A more advanced technique we have tried is to flock the head and tails of our silhouette decoys to remove any glare from the black areas of our decoys. Please let us know if this article helped you learn how to make your own goose silhouette decoys by commenting below.